
DIY: Building Your Own Worm Bin & Getting Started Vermicomposting
Don’t think you have any room for traditional backyard composting at home? We hear that often from residents with small yards or who live in apartments or condos. Have you considered composting with a worm bin? Now, don’t make that face. Worm bins are easy, don’t smell, are a great way to recycle food, and are lots of fun (kids love them) . . . and you end up with a great amendment/fertilizer for your plants (including house plants). You can buy commercial worm bins, but making your own is easy and inexpensive.
Materials & Tools
- Two 8-10 gallon plastic storage bins
- Drill (with 1/4 in. & 1/16 in. bits) for making drainage and air holes
- Newspaper, shredded office paper (bleached/printed on is okay), or coconut fiber (coir)
- About a pound of redworms (available from worm farmers or your local nursery)
Build the Worm Bin
Follow these steps to build the worm bin.
- Drill about 10 ventilation holes on each side of the bins near the top edge using the 1/16 in. bit. Keeping the holes small will help prevent fruit flies from entering the bin.
- Drill about 20 evenly spaced 1/4 in. holes in the bottom of the upper bin. These holes provide drainage; do not drill holes in the bottom of the lower bin.
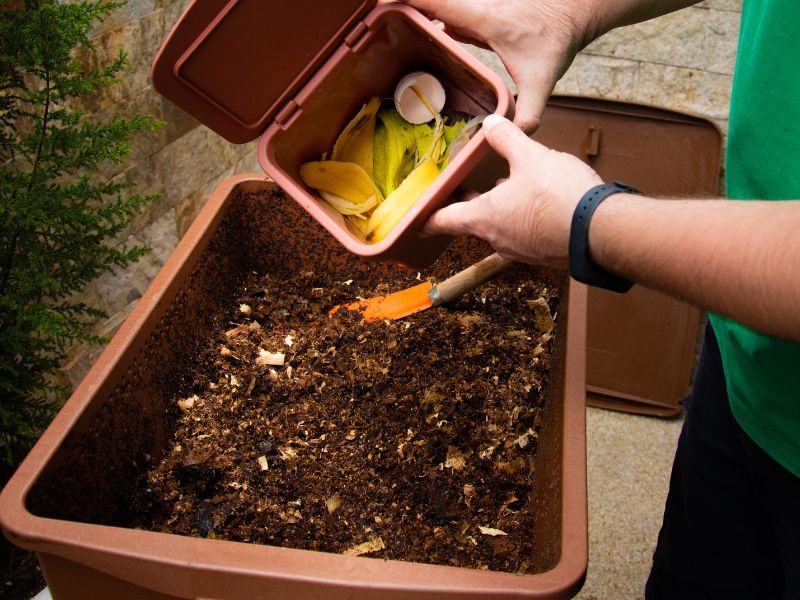
- Prepare bedding for the worms by shredding newspaper (if using) into 1-in. strips or soaking the coir in water for 30 minutes. (You can add coffee grounds to the mix, as well!) Worms need bedding that is moist but not soggy. Moisten paper by soaking in water, squeezing out excess moisture, and re-fluffing; or slowly add water to dry paper while mixing for even moisture. Cover the bottom of the bin with 3 to 4 inches of moist bedding.
- Add your worms to the bedding. One pound of redworms will process 3 to 4 pounds of food scraps a week. There are about 1,000 worms in a pound. If you start out with less than a pound, don’t worry — they multiply very quickly. Add a handful of soil or finely ground eggshells to the bin to provide the worms with grit to help them digest.
- Place bin in a well-ventilated area, such as a laundry room, garage, balcony, under the kitchen sink, or outside in the shade. Use the bin without drainage holes to catch liquid (leachate) that drains from the upper bin. This leachate is a great liquid fertilizer, but is best used only on non-edible plants.
- Feed the worms slowly at first. As the worms multiply, you can add more food. Bury the food in a different section of the bin each week. The worms will follow the food scraps around the bin. Covering the bedding and food with a damp piece of burlap or a sheet of newspaper or cardboard will keep down fruit flies.
What do worms like to eat?
They are happiest on a vegetarian diet. Scraps that you would normally put down the garbage disposal can be put into your worm bin. Your worms will eat some foods faster than others – they have preferences just like we do. Worms need calcium to reproduce and grit to grind up their food, so add eggshells every once in a while.
Worms love to eat:
- Fruit Pieces & Peels
- Vegetable Pieces & Peels
- Coffee Grounds & Filters, Tea Bags & Strings (no staple)
- Egg Shells
- Shredded Newspaper
Worms eat small amounts of:
- Citrus Peels & Pieces
- Spicy Foods (Hot Peppers, Onions)
- Plain Bread, Cereal & Pasta
- Leaf Litter
Worms don’t like:
- Meat & Fish
- Dairy Products
- Oily Foods
- Salty Foods
- Woody Yard Waste
- Glossy/Shiny Paper
Final Step
Harvest the finished compost when the first bin is full and there are no recognizable bedding materials. Do this by placing food scraps in one corner of the bin to draw the worms over to a compact area. Once the worms have migrated to one corner, you can scoop out the (virtually) worm-free castings from the rest of the bin. New bedding and food can then be added to restart the process over again. (Leaving in some finished castings is okay, and may help speed up decomposition in the new bin).
Chop food into small pieces and bury it to encourage faster processing and to prevent odors and pests. A worm bin takes about 3 months to turn to castings (if no bedding is added in the last 2 months). Other decomposers (bacteria, fungi, ants, sow bugs, etc.) will become part of the worm bin, especially if it is an outdoor bin. Don’t worry, this diverse community is essential to the process!
Questions? Call or email our Climate Solutions Hotline: compost@solanacenter.org | (760) 436-7986 ex. 700.